

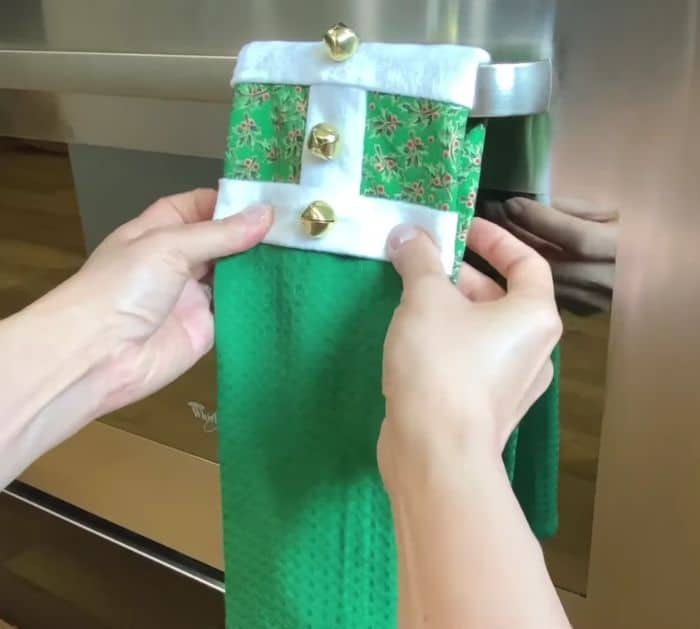
This adorable sewing project by Notches Sewing on YouTube does not only look good in your kitchen but it also fits the theme of the season perfectly! Try sewing this fun and easy tea towel holder, then sell it, or give it as a gift this holiday to your loved ones, and they’ll love it for sure. Learn how by following the step-by-step instructions down below and watch the video tutorial as well while you’re at it.
Materials:
- Red quilting cotton
- Lining fabric
- White nursery fleece
- Lightweight non-woven fusible interfacing
- Magnetic buttons
- ¾-inch cotton Twill tape or black fabric
- ¾-inch belt buckle or slider
- Needle and thread
- Scissors or rotary cutter and a cutting mat
- Fabric clips and pins
- Iron, for pressing
- Sewing machine
- Pattern (Click here to download the pattern)
Directions:
Step 1
Print and cut out the pattern, then clip the notches as well, wash, and press your quilting cotton, too. Before placing your pattern on top of your fabric, make sure not to use the selvage edges, then place the paper template with the grain lines parallel to the selvage edges, then start cutting all of the required pieces, and snip off the notches as well. Use the white fleece for the fur part of the towel holder, then cut it out, and cut the interfacing using the back piece template. Place the fusible cutout on top of the template with its glue side facing down, then mark the dots where the magnetic buttons would go later, and then flip it over so its glue side is facing up.
Step 2
Place the back piece on top of the interfacing, then press nicely to fuse, and snip off the mark for the magnetic buttons. Cut a piece of black fabric for the Santa belt, then fold it in half lengthwise, crease, open, fold both sides toward the center, and press nicely. Insert it into the buckle or slider, then place it on top of the front piece, pin it in place, and sew. Place the white strips at the top and bottom with their right sides facing and edges matching, then pin them in place, and sew on each side. Open the fabric, then place the large red fabric piece on top with their right sides facing, and sew them together on one side.
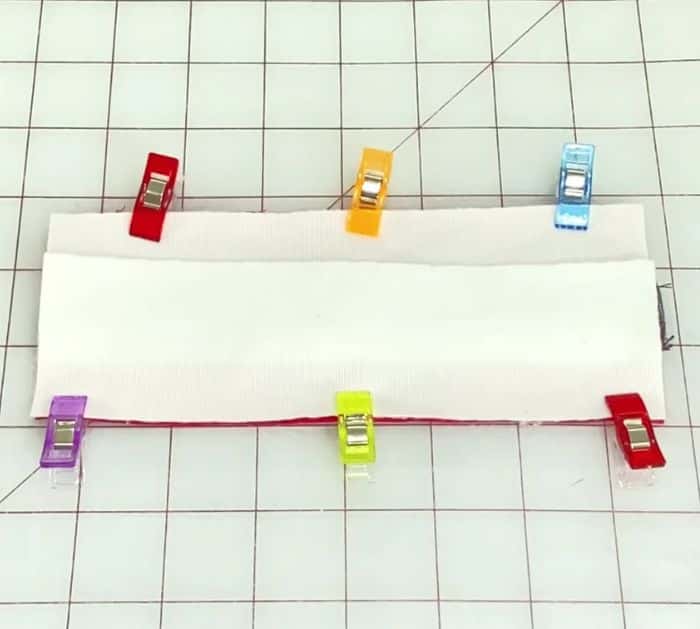
Step 3
Open the fabric, flip it over, then give it a nice press with the seams going in one direction, and flip it over so that the right side is facing up. Place the back pieces above the top and bottom with their right sides facing together and the glue side facing up. Match their notches and pin them together, then prepare the inner panels as shown in the video, and sew them on each long side. Give both pieces a nice press including the seams, then attach the button, and insert the lining piece.
Step 4
Clip them around in place and sew them together on one short side. Pull the inside piece out, then press nicely, fold it over in half, and tuck the inner edges to sew the outer edges together first. As you sew the edges, pull the tucked edges slowly until completely sewn together, then pull it right side out through the gap at the side, and press nicely. Stitch the gap close, then topstitch along the bottom of the buttons, fold a towel into 3 lengthwise, and insert through the hole of the holder.
*All these images are credited to Notches Sewing via YouTube. Give her channel a visit and subscribe for more!
How To Sew A Removable Christmas Hanging Tea Towel Holder
The post How To Sew A Removable Christmas Hanging Tea Towel Holder appeared first on DIY Joy.